When you are craving a dessert that is equal parts festive and decadent, these Valentine’s Day Sugar Cookie Bars deliver on every level. Imagine sinking your teeth into a thick, square treat with a perfectly soft, chewy, golden center. These bars are beautifully structured to hold their shape, yet tender enough to reveal a wonderfully soft interior when a piece is broken off.

Topped with a generous, luscious layer of smooth light pink cream cheese frosting, every single bite offers a rich and tangy contrast to the sweet dough. Finished with a playful dusting of red and pink nonpareils sprinkles, they look straight out of a high-end bakery display. Best of all, they capture the bright, appetizing magic of a professionally crafted pastry right in your own kitchen.
Why You’ll Fall in Love with These Frosted Treats
- Unbeatable Texture: Thanks to a touch of cornstarch and sour cream, the dough bakes into a remarkably soft and chewy golden texture that never dries out.
- No Chilling Required: Unlike traditional rolled cookies, you simply press this dough into a pan, saving you precious time and effort.
- Bakery-Worthy Frosting: The smooth light pink cream cheese frosting provides a thick, tangy crown that balances the sweetness beautifully.
- Aesthetic Appeal: The vibrant red and pink nonpareils sprinkles make these bars instantly festive, bright, and photo-ready.
The Secret Building Blocks for a Soft Golden Center
Every ingredient here plays a vital role in creating that signature thick and chewy structure. Using room temperature dairy is crucial for a smooth integration.
For the Chewy Cookie Base
Unsalted Butter & Granulated Sugar: You will need 1/2 cup (115g) of softened unsalted butter and 1 cup (200g) of granulated sugar. Creaming these together introduces air, which helps the bars rise gently without becoming cakey.
Egg & Sour Cream: 1 large egg binds the dough, while 1/4 cup (60g) of full-fat sour cream adds vital moisture. The sour cream is the invisible culinary secret that guarantees a soft interior.
Dry Ingredients: A blend of 2 1/4 cups (280g) all-purpose flour, 1/2 tsp (2g) baking powder, and 1/2 tsp (3g) salt creates the structure. Adding 1 tbsp (8g) of cornstarch guarantees the crumb stays beautifully tender.
Vanilla Extract: 1 tsp (5ml) of pure vanilla extract infuses the dough with that classic, nostalgic bakery aroma.
For the Light Pink Frosting & Topping
Cream Cheese & Butter: A mix of 8 oz (226g) softened cream cheese and 1/4 cup (57g) softened unsalted butter forms a sturdy yet melt-in-your-mouth foundation. This combination ensures the frosting sets up thick enough to stack.
Powdered Sugar & Vanilla: 3 cups (360g) of powdered sugar sweetens and thickens the mixture, while 1 tsp (5ml) of vanilla extract rounds out the flavor.
Food Coloring & Sprinkles: Just 1-2 drops of pink gel food coloring achieve that smooth light pink hue. Finally, 2 tbsp (30g) of red and pink nonpareils sprinkles provide that necessary colorful crunch.

Essential Kitchen Tools for Perfect Squares
To ensure your Valentine’s Day Sugar Cookie Bars bake evenly and stack perfectly, you need the right tools. An 8×8-inch (20x20cm) metal baking pan is ideal for producing thick bars with straight edges. Always line your pan with parchment paper, leaving an overhang, so you can effortlessly lift the cooled slab out for clean slicing.
Crafting the Ultimate Valentine’s Day Sugar Cookie Bars
Follow these precise steps to achieve that appetizing, macro-shot-worthy visual appeal and heavenly texture.
1. Preparing the Dough Foundation
Preheat your oven to 350°F (175°C) and line your 8×8-inch (20x20cm) baking pan with parchment paper. In the bowl of a stand mixer fitted with a paddle attachment, beat 1/2 cup (115g) softened butter and 1 cup (200g) granulated sugar on medium speed for 2 minutes until light and fluffy. Add the egg, 1/4 cup (60g) sour cream, and 1 tsp (5ml) vanilla extract, beating until completely combined.
2. Blending the Dry Ingredients
In a separate bowl, whisk together the 2 1/4 cups (280g) flour, 1 tbsp (8g) cornstarch, 1/2 tsp (2g) baking powder, and 1/2 tsp (3g) salt. Gradually add this dry mixture to your wet ingredients with the mixer on low speed. Stop mixing as soon as the dough forms to prevent gluten overdevelopment, which can make the bars tough instead of soft and chewy.
3. Pressing and Baking the Bars
Transfer the dough into your prepared baking pan. Using a silicone spatula or lightly floured hands, press the dough into an even, flat layer reaching all the corners. Bake for 18-22 minutes. You are looking for a specific visual cue: the edges should have a light golden texture, but the center should still look slightly underbaked. Remove from the oven and let the bars cool completely in the pan.
4. Whipping the Cream Cheese Frosting
While the cookie base cools, wipe your stand mixer bowl clean. Beat 8 oz (226g) softened cream cheese and 1/4 cup (57g) softened butter on medium-high speed until entirely smooth and creamy. Reduce the speed to low and slowly add the 3 cups (360g) powdered sugar and 1 tsp (5ml) vanilla extract. Once incorporated, add 1-2 drops of pink gel food coloring and whip on high for 1 minute until you have a generous, smooth light pink frosting.
5. Frosting and Slicing
Use the parchment overhang to lift the fully cooled cookie slab onto a bright white surface or cutting board. Spread the smooth light pink cream cheese frosting in a generous, even layer over the top. Immediately scatter the 2 tbsp (30g) of red and pink nonpareils sprinkles so they adhere to the frosting. Using a large, sharp chef’s knife, slice the slab into 9 or 16 thick square sections.
Pro Tips for Achieving that Bakery-Style Chew
- Do Not Overbake: The secret to a soft interior that looks incredible when a piece is broken off is pulling the pan out while the center still looks slightly soft. It will continue to set as it cools.
- Room Temperature Ingredients: Your cream cheese and butter must be completely softened to room temperature to prevent lumpy frosting.
- Clean Slices: For bakery-worthy, razor-sharp edges, chill the frosted uncut slab in the refrigerator for 20 minutes before slicing. Wipe your knife blade clean with a damp towel between every single cut.
- Gel Color Over Liquid: Always use gel food coloring. Liquid food coloring can water down your cream cheese frosting, ruining that thick, generous layer.
Keeping Your Cookie Bars Fresh and Frosting Intact
Because these bars feature a cream cheese frosting, they must be stored in the refrigerator. Place them in an airtight container in a single layer, or stack them with sheets of wax paper in between to protect the frosting. They will stay fresh and chewy for up to 5 days. For the best texture, let them sit at room temperature for 15 minutes before serving to soften the crumb.
What to Serve Alongside Your Sweet Treats
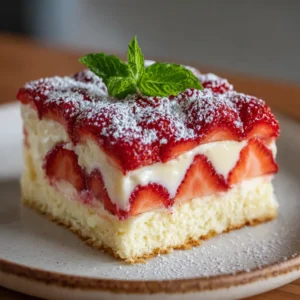
If you are curating a gorgeous dessert table for a party, these Valentine’s Day Sugar Cookie Bars are the perfect centerpiece. They pair incredibly well with the fruity brightness of our Strawberry Cheesecake Cookies. If you want to offer a sophisticated contrast, adding a platter of our Cannoli Cheesecake Bars creates a beautiful visual variety.
For guests who prefer deep, rich flavors, our decadent Caramel Cheesecake Cookies are a phenomenal pairing. You can also mix up the textures by serving these alongside some warm, gooey Gooey Pineapple Upside-Down Cookies.
Answering Your Top Questions About Frosted Cookie Bars
Yes! You can bake the cookie base up to 2 days in advance. Keep it tightly wrapped at room temperature, then add the cream cheese frosting on the day you plan to serve them.
While homemade cream cheese frosting provides the best thick, smooth texture and rich flavor, you can use a high-quality store-bought frosting in a pinch. Just stir in a drop of pink gel food coloring before spreading.
The secret to bakery-clean edges is chilling the fully frosted cookie slab in the refrigerator for 20-30 minutes before cutting. Use a large chef’s knife and wipe the blade completely clean with a warm, damp paper towel between every single slice.
Hard cookie bars are usually the result of overbaking or overmixing the dough. Stop mixing as soon as the flour disappears, and remove the pan from the oven while the center still looks slightly soft—it will continue to set as it cools.
Print the Recipe for Your Valentine’s Day Sugar Cookie Bars
The Ultimate Valentine's Day Sugar Cookie Bars
Ingredients
Equipment
Instructions
- Preheat your oven to 350°F (175°C) and line your 8x8-inch (20x20cm) baking pan with parchment paper.
- In the bowl of a stand mixer fitted with a paddle attachment, beat 1/2 cup (115g) softened butter and 1 cup (200g) granulated sugar on medium speed for 2 minutes until light and fluffy.
- Add the egg, 1/4 cup (60g) sour cream, and 1 tsp (5ml) vanilla extract, beating until completely combined.
- In a separate bowl, whisk together the flour, cornstarch, baking powder, and salt. Gradually add this dry mixture to your wet ingredients with the mixer on low speed just until combined.
- Transfer the dough into your prepared baking pan. Press the dough into an even layer. Bake for 18-22 minutes until the edges have a light golden texture but the center remains soft. Let cool completely.
- Beat 8 oz (226g) softened cream cheese and 1/4 cup (57g) softened butter on medium-high speed until entirely smooth and creamy.
- Reduce speed to low and slowly add powdered sugar and vanilla. Once incorporated, add 1-2 drops of pink gel food coloring and whip on high for 1 minute until smooth and light pink.
- Spread the cream cheese frosting evenly over the cooled cookie slab. Immediately scatter the red and pink nonpareils sprinkles over the top. Slice into squares and serve.
Notes
Tip 2. Chill the frosted slab for 20 minutes before slicing to get perfectly clean, straight edges.

Share the Love This Valentine’s Day
There is nothing quite like sharing a tray of thick, perfectly frosted treats with the people you care about. If you bake these stunning, chewy bars, we would love to hear how they turned out in the comments below! Be sure to follow us and pin this recipe to your dessert boards on Pinterest so you never lose track of this bakery-quality favorite.