Welcome to your new favorite dessert obsession: this incredible Pistachio Tiramisu. If you love the classic Italian dessert but crave a unique, nutty twist, this recipe is for you. We’re swapping cocoa for a luscious, homemade pistachio cream that infuses every layer with a rich, vibrant flavor. It’s an elegant, no-bake dessert that looks stunning and tastes even better. Forget the coffee; this version uses a simple milk dip to let the pure pistachio flavor shine through, creating a dessert that is both sophisticated and incredibly easy to assemble.
This recipe is perfect for any occasion, from a quiet weeknight treat to the show-stopping finale of a dinner party. The layers of creamy mascarpone, tender ladyfingers, and rich pistachio cream create a texture that is simply divine. Let’s dive in and make this unforgettable dessert together.

Why This Is The Best Pistachio Tiramisu Recipe
You’ll fall in love with this recipe for its simplicity and incredible flavor. It’s a modern take on a classic that will have everyone asking for seconds.
- Intense Pistachio Flavor: We use a homemade pistachio cream that provides a much richer and more authentic flavor than store-bought alternatives. It’s the secret to making this dessert truly special.
- No-Bake & Easy: This entire dessert comes together without turning on your oven. It’s an assembly-only recipe, making it perfect for any skill level and ideal for warm weather.
- Perfectly Creamy Texture: The combination of whipped heavy cream and mascarpone cheese creates a light, airy, and incredibly smooth filling that melts in your mouth.
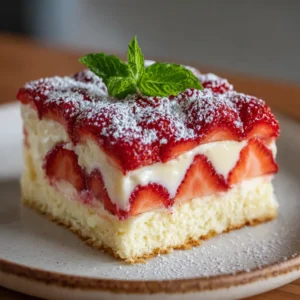
- Elegant & Impressive: With its beautiful green hue and layered presentation, this Pistachio Tiramisu is a true showstopper. It looks like it came from a high-end Italian bakery, but you made it right in your own kitchen!
The Key Ingredients for Pistachio Tiramisu
Crafting the perfect Pistachio Tiramisu starts with high-quality ingredients. Each component plays a vital role in creating the final, delicious product. Here’s what you’ll need.
For the Pistachio Cream:
- Raw, Unsalted Pistachios: The star of the show! Using raw, unsalted pistachios allows you to control the final flavor and ensures the purest pistachio taste.
- Sweetened Condensed Milk: This adds sweetness and creates a luxuriously smooth, creamy texture without any extra cooking.
- Milk: Just a splash is needed to help the pistachios blend into a perfect, spreadable cream.
For the Mascarpone Filling & Assembly:
- Mascarpone Cheese: This Italian cream cheese is essential for tiramisu. It should be cold and firm for the best results.
- Heavy Whipping Cream: Creates the light, airy texture of the filling. Make sure it’s very cold before you start whipping.
- Powdered Sugar: Sweetens the mascarpone filling while dissolving easily, ensuring a smooth, non-gritty texture.
- Vanilla Extract: A touch of vanilla enhances all the other flavors in the dessert.
- Ladyfingers (Savoiardi): These dry, egg-based biscuits are the traditional choice for tiramisu because they absorb the liquid without turning to mush.
- Milk: We use milk instead of coffee to dip the ladyfingers. This provides moisture without overpowering the delicate pistachio flavor.
- Chopped Pistachios & Powdered Sugar: For a beautiful and delicious garnish that adds a bit of texture.

How to Make Pistachio Tiramisu Step-By-Step
This recipe is all about simple, clear steps. Follow along to create a flawless dessert.
Step 1: Make the Pistachio Cream
Start by making the vibrant pistachio cream. In a high-powered blender or food processor, combine the raw pistachios, sweetened condensed milk, and milk. Blend on high for 2-3 minutes, scraping down the sides as needed, until the mixture is completely smooth and creamy. The color should be a beautiful, pale green. Set it aside.
Step 2: Prepare the Mascarpone Filling
In a large mixing bowl, use an electric mixer to beat the cold heavy whipping cream until stiff peaks form. In a separate bowl, whisk together the cold mascarpone cheese, powdered sugar, and vanilla extract until smooth and combined. Be careful not to overmix the mascarpone. Gently fold about one-third of the whipped cream into the mascarpone mixture to lighten it. Then, add the remaining whipped cream and fold until just combined and no streaks remain.
Step 3: Combine the Creams
Gently fold about half of your prepared pistachio cream into the mascarpone filling until it’s incorporated. This creates the base pistachio-mascarpone layer.
Step 4: Assemble the First Layer
Pour the milk for dipping into a shallow dish. One by one, quickly dip half of the ladyfingers into the milk—just a second on each side is enough. Arrange them in a single layer in the bottom of an 8×8 inch baking dish. Spread half of the pistachio-mascarpone filling evenly over the ladyfingers. Then, dollop the remaining plain pistachio cream over the top and gently spread it out.
Step 5: Assemble the Second Layer and Chill
Dip the remaining ladyfingers in milk and arrange them on top of the pistachio cream layer. Cover with the rest of the pistachio-mascarpone filling, spreading it into a smooth, even layer. Cover the dish with plastic wrap and refrigerate for at least 6 hours, but preferably overnight. This chilling time is crucial for the flavors to meld and the tiramisu to set properly.
Step 6: Garnish and Serve
Just before serving, generously sprinkle the top of the tiramisu with finely chopped pistachios and a light dusting of powdered sugar. Slice and serve cold.
Pro Tips for Success
Want to make your Pistachio Tiramisu absolutely perfect? Here are a few expert tips to guarantee success.
- Don’t Over-Soak the Ladyfingers: A quick dip is all you need. If you soak them for too long, they will become soggy and your tiramisu will be watery. The goal is a soft, cake-like texture, not mush.
- Use Cold Ingredients: For the fluffiest, most stable mascarpone cream, ensure your heavy cream and mascarpone cheese are very cold, straight from the fridge.
- Be Gentle When Folding: When you combine the whipped cream and mascarpone, use a gentle folding motion with a spatula. This keeps the air in the whipped cream, ensuring a light and airy final texture.
- Chill Overnight for Best Results: I know it’s hard to wait, but chilling the tiramisu overnight makes a huge difference. It allows the ladyfingers to soften perfectly and the flavors to deepen and meld together beautifully.
Flavor Variations & Substitutions
While this recipe is fantastic as is, you can easily customize it to your liking. For a different nutty flavor, you might love this Pecan Upside-Down Cake.
- Add White Chocolate: Fold some melted and cooled white chocolate into the mascarpone cream for an extra layer of decadence.
- A Hint of Citrus: Add a teaspoon of lemon or orange zest to the mascarpone filling to brighten up the flavors. For another bright and zesty dessert, try these No-Bake Lemon Truffles.
- Try a Coffee Version: If you miss the classic coffee flavor, you can dip the ladyfingers in cooled espresso instead of milk.
- Make it Boozy: Add a splash of amaretto or a pistachio liqueur to the mascarpone cream for an adult-friendly version.
How to Store Pistachio Tiramisu
Proper storage is key to keeping your tiramisu fresh and delicious. Store it tightly covered with plastic wrap in the refrigerator. It will stay fresh for up to 4 days. The flavors actually get even better on the second day!
I do not recommend freezing this tiramisu, as the mascarpone cream can separate upon thawing, resulting in a grainy texture. This dessert is best enjoyed fresh. If you are looking for a great make-ahead party recipe, these Crockpot Mississippi Meatballs are always a crowd-pleaser.
FAQs About This Recipe
Yes! This recipe is specifically designed to be coffee-free to allow the pistachio flavor to be the star. We use milk for dipping the ladyfingers to provide moisture without competing flavors.
Absolutely! This is a perfect make-ahead dessert. You can assemble it up to 2 days in advance. Keep it covered in the refrigerator, and wait to add the chopped pistachio garnish until just before serving.
For an authentic tiramisu texture and flavor, mascarpone is highly recommended. It has a rich, creamy quality that is difficult to replicate. In a pinch, you could try using full-fat cream cheese mixed with a little heavy cream, but the result will be tangier.
For the best results, the tiramisu should be refrigerated for at least 6 hours, but overnight is ideal. This allows the ladyfingers to soften to a perfect cake-like consistency and for all the flavors to meld together.
For the best flavor and color, use raw, unsalted, and shelled pistachios. Roasted pistachios can also be used, but they may result in a slightly darker, less vibrant cream.
The Perfect No-Bake Pistachio Dessert
This Pistachio Tiramisu recipe is a game-changer. It’s a simple, elegant, and incredibly delicious dessert that is sure to impress. The combination of nutty pistachio and creamy mascarpone is truly a match made in heaven. Give it a try and let me know what you think in the comments below!
If you loved this recipe, please consider sharing it on Pinterest! Your support helps me create more delicious content for you.

Pistachio Tiramisu Recipe
Pistachio Tiramisu: A Creamy, No-Bake Italian Dream
Ingredients
Equipment
Instructions
- In a high-powered blender, combine raw pistachios, sweetened condensed milk, and 2 tbsp of milk. Blend on high until completely smooth and creamy, about 2-3 minutes. Set aside.
- In a large bowl, beat the cold heavy whipping cream with an electric mixer until stiff peaks form. In a separate bowl, whisk the cold mascarpone, powdered sugar, and vanilla extract until smooth. Gently fold the whipped cream into the mascarpone mixture in two additions until just combined.
- Gently fold about half of the prepared pistachio cream into the mascarpone filling until incorporated.
- Pour 1 cup of milk into a shallow dish. Quickly dip half of the ladyfingers into the milk and arrange them in a single layer in an 8x8 inch dish. Spread half of the pistachio-mascarpone filling over the ladyfingers. Dollop the remaining plain pistachio cream over the top and gently spread.
- Dip the remaining ladyfingers in milk and arrange them over the pistachio cream. Top with the remaining pistachio-mascarpone filling and smooth the top. Cover and refrigerate for at least 6 hours, or preferably overnight.
- Before serving, sprinkle the top with chopped pistachios. Slice and serve cold.
Notes
Tip 2: Do not over-soak the ladyfingers; a very quick dip is all that is needed to prevent a soggy dessert.
Tip 3: Chilling overnight allows the flavors to meld and results in the best taste and texture.